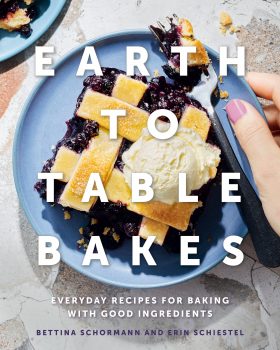
Whether you love to bake over the holidays, or just love to eat what others bake, this is the time of year to ditch the guilt and indulge in the flakiest, freshest, delightful-est baked treats available. The new cookbook, Earth to Table Bakes, by two world-class pastry chefs from Hamilton offers abundant inspiration this Christmas season for bakers of all skill level and experience.
Chefs Bettina Schormann and Erin Schiestel met at the Ancaster Mill in 2004 where Bettina was executive pastry chef and Erin a co-op high school student with a natural talent for baking. They worked together for years, creating and refining recipes for the restaurant and eventually reconnecting again at the restaurant Bettina co-founded in Hamilton, Earth to Table: Bread Bar where Erin is now executive baker/chef for all three locations (one in Guelph and a second in Hamilton).
In Earth to Table Bakes: Everyday Recipes for Baking with Good Ingredients, the two Hamilton chefs share recipes spanning cookies, cakes, pies, loaves, squares, doughnuts and more.

- When you started to write Earth to Table Bakes, how did you decide what recipes to include?
B: Deciding on the recipes was a bit of a process. We made a long list of about 200 potential recipes and then scaled it down to 100 (plus staples and master recipes) based on the advice of our peers and publisher. Erin is an excellent cake maker and loves to make doughnuts, and I lean more towards cookies and tarts. In the end the writing was divided equally and was surprisingly seamless between the two of us.
E: The ideas that came to mind immediately were recipes we personally like to not only make but eat ourselves. Nostalgic recipes also were a no-brainer, like our Honey Cruellers, Pineapple Upside Down Cake and Ultimate Banana Bread. After the initial list was made, we went through it and picked our favourites and as Bettina mentioned, played to our strengths.
2. You’re very committed to the slow food movement that advocates using local ingredients as much as possible. How can home bakers incorporate this into their own kitchens?
B: Sourcing local ingredients seems to be getting easier. For baking we suggest looking for core ingredients on a local level. Local eggs and dairy are usually easy to find in most grocery stores or at farmers markets. For us, we are also able to locally source flour and grains. Sourcing locally takes a bit more work but is definitely worth it for the economy and the environment.
E: Incorporating local ingredients doesn’t have to be all-or-nothing. Flour or butter from the grocery store paired with local fruit or local honey will produce delicious results. Picking just a few priority ingredients to be sourced locally can take the intimidation factor away and make a big difference to your final result.
3. The recipes in Earth to Table Bakes use good old fashioned baking ingredients like butter and cow’s milk and cream, while advising against using gluten-free flours. Can you share why?
B: Our advice on not using gluten free flours is based on our experience that trying to substitute gluten free flour most often produces an undesirable product. A gluten free baked good needs a very specific recipe that creates a delicious gluten free product. This is not how we currently bake, and with our gluten-heavy baking environment, is not possible.
E: I don’t think we specifically advise against it; we’re just sharing the information that gluten-free flours are not direct substitutes for wheat flour. It made sense to us to write recipes based off of our strengths, which happens to be recipes using wheat flour. Gluten-free baking is almost an entire other world of baking and we wanted to make sure we were confident with the recipes we are sharing.
4. Among your favourite kitchen tools, which ones do you most highly recommend to home cooks?
B: For me, it’s a stand mixer and a silicone spatula.
E: An accurate set of measuring cups and spoons come to mind. Lots of sets are cutesy and look great but are not actually the volumes they are labelled as. Professional-quality tools can be purchased at a kitchen supply store for accurate measuring and baking success.
5. There’s a real sense of accomplishment when a challenging dish is baked to perfection. Were there any recipes in the book that you found challenging to perfect?
B: There were many! For me the Tahini cookies and Crumpets were the hardest.
E: Developing an at-home version of croissants was pretty challenging. Even at the restaurant, with all the tools at our disposal and having made them thousands of times, there’s still a mini celebration when the layers turn out just right.
6. No season seems more suited to baking than the holidays! What advice do you have to help home cooks make their holiday baking experience enjoyable, rather than stressful?
B: Planning is my greatest tip. Both Erin and I LOVE making lists and crossing things off. We have been doing this for years. And if Erin crosses off something that I have done I will re-write it so that I can cross it off myself! The list is down to the small details. Crossing off the list is so satisfying and keeps me organized.
E: Finding aspects of a recipe that can be made ahead of time should definitely be taken advantage of! If any sauce, filling, or dough can be made in advance, that saves time and stress day-of when your guests are arriving.
7. What recipes do you look forward to baking every Christmas?
B: I do have a celiac Uncle, so I have to challenge myself every holiday to come up with gluten free options for him. These are not dishes that I can put into mass production, but I enjoy the challenge.
E: I love Christmas morning breakfast and I look forward to baking any type of quiche. They’re versatile and can feed a large number of people. Our Beet and Feta Quiche is perfect for Christmas time.
8. Christmas morning at your house, what baked goods will be served first thing?
B: Christmas (and all family dinners are at my house only because I do really love to cook) is all about the turkey for me. I brine it for three days before I roast it. My greatest win for dessert with all the nieces and nephews happened the year that I made a meringue cake and used the left-over meringue to make a bunch of meringue kisses. They were such a hit! I’ll probably do that again this year.
E: Pie of any kind is my go-to. Chocolate Pecan or apple for my dad.
Recipe
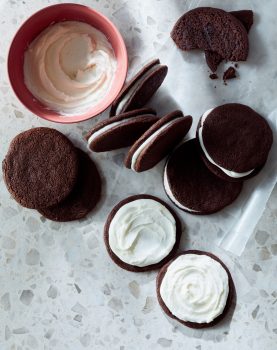
CHOCOLATE PEPPERMINT SANDWICH

The cookies used to make this cookie sandwich are chocolatey, wafer-thin, light, crispy, and delicious. The filling brings in peppermint flavour, but if you’re not a fan of mint with your chocolate, simply omit the peppermint extract. You’ll wind up with a cookie sandwich that tastes a lot like an Oreo instead! If you’re like us and you can’t get enough of these cookies, try using them in our recipes for Chocolate and Vanilla Brûlée Cheesecake (page 265) and Magic Bars (page 56) where they form a delicious cookie crust. MAKES 24 COOKIE SANDWICHES
Ingredients
CHOCOLATE COOKIE WAFERS
¾ cup (175 mL) granulated sugar
½ cup (125 mL) lightly packed brown sugar
½ cup (125 mL) unsalted butter, softened
1 teaspoon (5 mL) pure vanilla extract
1 cup (250 mL) all-purpose flour
¾ cup (175 mL) cocoa powder 1 teaspoon (5 mL) kosher salt
½ teaspoon (2 mL) baking soda
¼ cup (60 mL) heavy (35%) cream
PEPPERMINT FILLING
3 cups (750 mL) icing sugar
½ cup (125 mL) unsalted butter, softened
1 teaspoon (5 mL) pure peppermint extract (optional)
STEPS:
- MAKE THE CHOCOLATE COOKIE WAFERS In a stand mixer fitted with the paddle attachment, cream the granulated sugar, brown sugar, butter, and vanilla on medium speed until light and fluffy, about 2 minutes.
- In a medium bowl, whisk the flour, cocoa powder, salt, and baking soda. Add the flour mixture to the butter mixture. Mix on low speed until just combined. Add the cream. Mix until just combined.
- Using your hands, form the dough into two 5- × 2-inch (12 × 5 cm) logs. Tightly wrap each log in plastic wrap and place in the fridge for at least 1 hour or overnight.
- Preheat the oven to 350°F (180°C). Line 2 baking sheets with parchment paper.
- Remove the plastic wrap from the dough. Slice the dough logs into coins 1/8 inch (3 mm) thick. Arrange the cookies on the prepared baking sheets about 1 inch (2.5 cm) apart. Bake for 8 minutes. Turn the baking sheets and bake for an additional 2 minutes. The cookies are done when the tops are slightly cracked and look firm. Let cool completely.
- MAKE THE PEPPERMINT FILLING In a stand mixer fitted with the paddle attachment, cream the icing sugar, butter, and peppermint (if using) on high speed until light and fluffy.
- On a clean, flat surface, flip over half of the cookies. Spread about 2 tablespoons (30 mL) of filling on each of the cookies that you flipped over. Top with the remaining cookies.
Serve immediately or store in an airtight container at room temperature for up to 5 days or in the freezer for up to 3 months.

